Control Resonant: Orientation walkthrough
Overview & Key Takeaways
After a seven-year wait, we're finally back in the halls of The Oldest House in Control Resonant. However, there are some noticeable differences from our trek through the eerie locale in the original Control. For one, we're not embodying former protagonist, Jesse Faden, but instead her brother, Dylan, however the biggest change is we're certainly not trapped inside. That's hardly a good thing though, considering The Oldest House is easily the safest place in New York right now...
As we begin Control's long-awaited sequel, we'll be tasked with escaping The Oldest House, learning a bunch about Resonant's new combat style, and facing our first boss, which is a pretty punishing skill check. And this walkthrough will guide you through it all, telling you where to go and how to find every collectible along the path.
Control Resonant opens with Dylan waking in front of a giant stone pillar inside the Astral Plane. When you regain control, listen to the entity speaking to you, then push ahead towards the pillar. When you reach it, you'll get a prompt to interact with it, cueing a cutscene.
It'll end as Dylan pulls a mysterious pole out of his chest. Press the prompt on screen to pull the pole free, and you'll get a major decision off the bat: pick an Aberrant form.
To give you a quick rundown of what you're choosing here, Aberrant forms are essentially what weapon the big shiny pole sticking out of Dylan's chest is going to take on. You'll be able to wield two forms at a time, with the form you're currently choosing being the Primary Form. Each form favours a different playstyle. The options are:
- Glaive: Deals out wide attacks which are good for hitting multiple enemies simultaneously.
- Strike: Two quick blades that are good farming critical hits.
- Cleave: Slower but strong swing attack that deals huge damage when you attack a foe from behind.

Image credit: Rock Paper Shotgun / Remedy Entertainment
It's completely up to you which of the three to choose, but I do think Glaive presents the easiest playstyle, considering Control Resonant's foes will attack in big packs and crowd control will come in handy. We go into much more detail over in our Beginner Aberrant Forms guide, so check it out if you're struggling to make a decision.
Step 1. Leave The Oldest House
Once you've picked your Primary Aberrant form, you'll be free from your cell, so exit and enter the room beyond. Make sure to grab the two collectibles nearby:

Image credit: Rock Paper Shotgun / Remedy Entertainment
Collectible: Photo of Dylan And Jesse
Found on the coffee table next to Dylan's cell. As soon as you exit the cell, you'll find it across from the nearby sofa.
Collectible found.

Image credit: Rock Paper Shotgun / Remedy Entertainment
Collectible: Notes On The Ordinary AWE Case File
Found on the floor, directly next to the coffee table in the room containing Dylan's cell. You'll find it near the Photo Of Dylan And Jesse collectible.
Collectible found
When you're done hoovering up notes, continue out the doors at the back of the room and into the corridor ahead, then take a left through to Central Executive. Follow the path until you reach a locked gate, then head into the booth on your left and hit the button on the central panel to open the gate.

Image credit: Rock Paper Shotgun / Remedy Entertainment
Collectible: A Memo On Dylan Faden
Opposite where you hit the button in this booth, you'll find the Memo On Dylan Faden. Make sure to grab it before you leave.
Collectible found
Pass through the now-open gate, and you'll arrive in a large office block. You can find several collectibles in here, so make sure to grab all of these:

Image credit: Rock Paper Shotgun / Remedy Entertainment
Collectible: Complaint Letter
On a desk against the pillar in the centre of this office room, you'll find the Complaint Letter.
Collectible found

Image credit: Rock Paper Shotgun / Remedy Entertainment
Collectible: Containment Guard Note
Found in the vault with a bunk bed and a guard slumped against some shelves. On the bottom bunk of the bed, you'll find the Containment Guard Note.
Collectible found
When you've got all the collectibles in the room, head towards the seating area on the opposite side of the room from where you entered, then follow the path to the right of the tables and down towards an elevator at the end of the path.
You'll emerge in a room with your first enemy. This guy's all on his lonesome, so let's use him for a bit of target practice. For now, all you need to know is that tapping LMB / SQUARE / X will do your basic Primary Combo. Use it to defeat your foe, then head upstairs to the second floor.


Image credit: Rock Paper Shotgun / Remedy Entertainment
As you round the second floor, another enemy will spawn, this time using ranged attacks. We'll learn here that SHIFT / CIRCLE / B activates your dodge, letting you speed away from attacks. Definitely worth remembering this one, as we'll be doing it A LOT throughout the game.
Dodge around this guy's attacks and take him down, then defeat the other enemies that spawn and head down the path to his right. You'll reach a fork in the road. Take a right here to enter Jesse's office.
We'll find a good few collectibles to ransack inside, so make sure you grab each of the notes listed below:

Image credit: Rock Paper Shotgun / Remedy Entertainment
Collectible: A Letter From Emily Pope To The Director
Found on a shelf to the right of Jesse's desk, near a tape player.
Collectible found

Image credit: Rock Paper Shotgun / Remedy Entertainment
Collectible: Dimensional Research: Slide Repairs
Found on Jesse Faden's desk.
Collectible found

Image credit: Rock Paper Shotgun / Remedy Entertainment
Collectible: Jesse's ID
Found on Jesse Faden's desk.
Collectible found

Image credit: Rock Paper Shotgun / Remedy Entertainment
Collectible: Jesse's Note To Self
Found on the sofa in the bottom right-hand corner of Jesse Faden's office.
Collectible found
When you've gathered all the knick-knacks conveniently placed around the office, leave and take out the three enemies down the corridor ahead, then take the elevator at the end of the corridor down to the bottom floor.

Image credit: Rock Paper Shotgun / Remedy Entertainment
You'll arrive in the Oldest House lobby, so hop the barricade and pass through the hole in the wall below to reach the outside world.
Step 2: Find Zoe
Now you're outside, it's time to track down the mysterious woman on the radio. When you regain control, hold ALT / LB / L1 to pull up the Radio menu, then look at the eyeball symbol in front of the tower in the distance. You'll get dialogue options you can say to Zoe, who's on the radio. Report the Hotel to her, then proceed down the street towards the tower.

Image credit: Rock Paper Shotgun / Remedy Entertainment
You'll run into a few Hiss here, so wipe them out, then follow the street to your right. When you reach a fork in the road, pass into the alleyway that you'll spot on your left. It'll take you to a loading bay that quickly fills with Hiss. Dispatch them, paying careful attention to the big stumbling Hiss with a mutated head, who will take a beating to finally put away.
When you finish the fight, you'll be asked to choose another weapon for your arsenal. This time, your secondary Aberrant Form.
Picking a Secondary Aberrant Form
You know the deal here. You'll need to pick an Aberrant Form from three choices. This time around, it'll be your Secondary Aberrant Form, bound to the RMB / TRIANGLE / Y button. The weapon forms on offer are:
- Crush: A giant hammer with a slow wind-up but huge damage when it lands. Knocks down enemies and deals Falter build-up.
- Drill: A drill-like spear that, when charged, whittles away enemies while stunlocking them and dealing Falter build-up.
- Extend: A long-range attack that can deal effective crowd control and deals Falter build-up when charged.

Image credit: Rock Paper Shotgun / Remedy Entertainment
Whatever weapon you picked for your Primary Aberrant Form, it's a solid idea to pick a Secondary that counterbalances it. For example, if you picked the Glaive, which is great for crowd control, pick either the Crush or Drill for dealing heavy damage to single targets.
Now you have your Secondary Aberrant Form, use it to take down the new wave of enemies that have spawned. When they're gone, the corruption will cleanse, so hop over the fence and climb up the scaffolding, then follow the path across the rooftops, hopping up them until you emerge on a long street. Take out enemies as you push down to the end of the street and find Zoe.

Image credit: Rock Paper Shotgun / Remedy Entertainment
Speak to Zoe, choosing any dialogue options you desire, then follow her down the nearby alley and you'll emerge at the edge of a rooftop. Hop down to the rooftops below and follow them until you reach a spot where you see a giant vision of Jesse.
When it ends, hop down to the rooftop ahead of you and enter the doorway you find, following the passageway below down to a long path leading to a TV. Interact with the TV.
Step 3: Search For Jesse
When you regain control, pass through the door in front of you, and you'll enter a dark void with grassy pathways. Follow the route, navigating up the platforms you find and across the gaps between them. Eventually, you'll come across a car park. Hop down to it, and you'll find Jesse leaning against a railing, cueing a cutscene.

Image credit: Rock Paper Shotgun / Remedy Entertainment
When you regain control, you'll have unlocked the Double Jump, so use it to hop behind the railing Jesse was leaning on to reach the platforms ahead. Follow it until you reach another TV. Interacting with this TV will unlock the Elevate ability, which allows you to float across gaps by holding jump after a double jump.
Continue along the path, flying across platforms until you reach a third TV. Access it to unlock Rush. Rush lets you sprint at high speed, which is great for dodging attacks and jumping large gaps. For now, use it to make the long jumps across the next string of buildings to reach two more TVs that reveal further paths, eventually taking you to a final TV where you'll trigger a cutscene.

Image credit: Rock Paper Shotgun / Remedy Entertainment
After the cutscene's done, you'll appear back at the bridge which led to the first TV. Cross it, head up the stairs and reach the rooftop, then cross to the adjacent rooftop ahead. Several Hiss will spawn in, so vanquish them, then continue to follow the path across the rooftops until you arrive at the source of the patterning: a gallery.
Step 4: The Artist Boss Fight
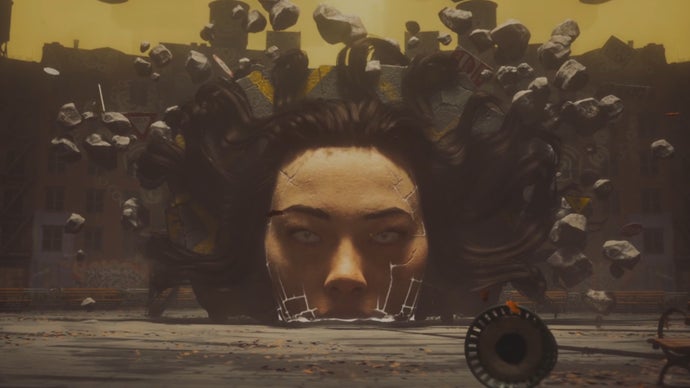
Enter the gallery and pass through it until you trigger a cutscene, unveiling the giant head that's about to stress test your entire skill set.

Image credit: Rock Paper Shotgun / Remedy Entertainment
This is the Artist, and to be honest with you, she's a pain in the ass. She loves to run away when you engage, has a powerful range-focused move set that you'll need to learn to dodge to endure, and can summon environmental hazards that you'll need to keep on top of.
This fight largely works in two phases. So let's cover each one:
Phase 1
For phase 1, the Artist will largely just engage with her basic attacks. She'll stay at range, summoning cars and throwing them at you, or throw rocks you can float over. Evade her attacks, dodging out of the way before using Rush to close the distance and attack her.
Here, she'll summon two lamp posts, attacking with a slam attack and then holding the lamp posts out on either side of her head and swinging them together. Dodge each attack as it's about to land, using the dodge's I-frames to avoid damage, then continue piling on punishment. After you knock off a meaty portion of health, she'll float into the air.
Phase 2
In phase two, the Artist will float up and begin raising pieces of the ground around her. Unchecked, these turn into ruthless ranged attacks, where the Artist launches the chunks of ground at you. However, you can significantly shorten the entire fight if you manage to climb onto these floating pieces of ground as they levitate, then hop across to the one in front of her head and hit her.

Make sure to board the rocks when she begins floating, then climb up and knock her down. | Image credit: Rock Paper Shotgun / Remedy Entertainment
The blow will do heavy damage, but whether you knock her down or she descends on her own accord, she’ll eventually return to the ground. From now on, when she flees, rocks will fire from the sky, homing in on her movement path. She'll also be able to fire a range of street signs at you, which you'll have to dodge to close the distance.
Keep finding openings, dodging ranged attacks and avoiding her lamp post swings, and you'll bring her down, ending the fight with an execution. Her death will open the way to the Gap in the Astral Plane, where you'll be asked to pick a Special Ability.
Picking A Special Ability
Now we've beaten a boss, we'll get our first Special Ability choice. Each boss will reward you with one of several skills. You can only pick one, so you'll have to choose wisely. Right now, we can select between Barrage, Volatile Anomaly or Shield.
Barrage is good for those wanting a ranged option, Shield will make enduring damage easier and Volatile Anomaly lets you summon a floating ally that does low damage, so they're all relatively useful. Pick whichever suits your playstyle, which considering my muscle memory kept encouraging me to spam LB for a parry, was Shield.
From here, you can freely browse whatever you like in the Gap, but there isn't much else to grab here right now. Just know that, in the future, whenever you purchase something in the Gap, it'll be a permanent purchase. In other words, be sure to fine-tune your build before you leave to continue your adventures.

Image credit: Rock Paper Shotgun / Remedy Entertainment
When you emerge from the Gap, you'll have a chat with Emily Pope at FBC, and then the Orientation mission will conclude. From here, you'll get a new mission and be able to freely explore the city.
And that's all you need to know to complete Orientation and begin Control Resonant's campaign. Need more help navigating Control Resonant? Be sure to check out our guides on the best Talents to pick first and how to unlock SHUM arcade cabinets. If neither of these are quite what you're looking for though, you can always find our full list of Control Resonant guides here.