Subnautica 2: How to get a Fully Functional Fabricator
Overview & Key Takeaways
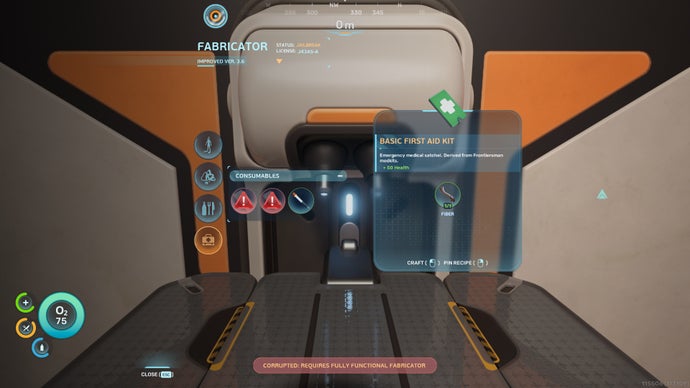
Pretty early on in Subnautica 2, you'll be told that you require a Fully Functional Fabricator in order to unlock crafting potential for a whole bunch of important items. You'll start out with a Fabricator on your Lifepod, but it'll only get you so far.
To get a Fully Functional Fabricator, you're going to need to build a base which will require a fair amount of effort and resource collecting. I promise you though, that effort will pay off, especially if you want to get any further in the game. And while Subnautica 2 won't tell you how to do it, I will. Here's the steps you need to follow to secure that Fully Functional Fabricator and get crafting!
Pretty early on in Subnautica 2, you'll be told that you require a Fully Functional Fabricator in order to unlock crafting potential for a whole bunch of important items. You'll start out with a Fabricator on your Lifepod, but it'll only get you so far.
To get a Fully Functional Fabricator, you're going to need to build a base which will require a fair amount of effort and resource collecting. I promise you though, that effort will pay off, especially if you want to get any further in the game. And while Subnautica 2 won't tell you how to do it, I will. Here's the steps you need to follow to secure that Fully Functional Fabricator and get crafting!
1. Craft a Survival Multitool

Image credit: RPS/Unknown Worlds
If you're going to build a base, you're going to need to start with a Survival Multitool. This handy tool will help you clear debris, cut down plants to gather resources like Fibrous Pulp and warn off some aggressive sealife. To craft, you'll need to collect 3x Titanium and use your existing Fabricator on the Lifepod.
2. Craft a Scanner

Image credit: RPS/Unknown Worlds
Use your freshly-crafted Survival Multitool on the pink brain-looking plants, which can be found in caves under your Lifepod. They have a green glowing centre that you can also gather up which are Medical Gel Sacs (for Enhanced First Aid Kits). What you want for the scanner though is to chop the Acidic Raion Pouches, the pink brains, with your Survival Multitool.
Inside the same cave, gather 2x Copper, 2x Titanium, and 2x Quartz. Quartz is most commonly found inside the orange coral domes, which are easily spotted around your Lifepod. Then, craft a Battery and a Scanner.
3. Craft a Habitat Builder

Image credit: RPS/Unknown Worlds
This step takes a bit more grafting as you'll need to locate two Habitat Builder fragments and use your Scanner to unlock the Blueprint. These can be easily found, one is located 90m southwest of your Lifepod, just outside the Welcome Center and the second is found next to the Anita black box and Angel Comb that helps you cure Digestive Incompatibility. Scan both fragments and collect 2x Titanium, 4x Quartz, 4x Copper and another Acidic Raion Pouch to craft the Habitat Builder.
4. Build a Base

Image credit: RPS/Unknown Worlds
Using your Habitat Builder, pull up the menu and build a Room and a Hatch. While the Hatch Blueprint unlocks when you craft your Habitat Builder, you'll need to head 400m north of your Lifepod to scan the Room Blueprint.
A standard Room will then require 5x Titanium to craft and for the Hatch you'll need 1x Titanium and 1x Quartz. Head inside your miniature base and craft a Fabricator to place on your wall using 1x Titanium, 1x Copper and 1x Quartz. But, you'll need power if you want to get it up and running.
5. Add Solar Panels to your Base

Image credit: RPS/Unknown Worlds
To provide power to your base, you need to craft at least one Solar Panel, but I'd recommend two to start with. Each Solar Panel requires 1x Titanium and 2x Quartz. Luckily, the Blueprint is already unlocked, so you won't need to go and scan anything for this one either.
So, there you have it. A base and a way to get crafting with just five fairly simple steps, as long as you're happy to start collecting the resources you need. Thankfully, they're all pretty abundant around your Lifepod. With a base and power, your Fabricator will now become a Fully Functional Fabricator, allowing you to craft advanced gear such as Med Kits, Copper Wire, advanced diving equipment and more.
If you're looking for more ways to advance in Subnautica 2, we've got some handy guides to help you out including how to open the Axum Door in the Observatory and how to get the Tadpole, which you'll most definitely need if you haven't got it already.